PROSIM:737 SUITE
After my visit to FSWeekend 2012 I was convinced that my setup should be based on ProSim:737. Sander took his time to show me the suite and with a test license one month of testing began.
My main demands was.
-
No performance impact
-
Easy to configure
-
Easy to update
-
Serious coverage of the real Boeing 737 NG functions
Even on a one PC setup it performed okay with FSX. With a two PC setup it performs great.
The main argument for ProSim:737 is that is runs outside FS. This way it have no impact, and don't make FSX/P3D more fragile than it already is.
The installation can’t be more simple. ProSim consists of 6 different folders which just have to be copied to a given location.

On my main PC I have the only installed P3D, Weather program, PFPX.
On my "MIP" PC all the Prosim components resides.
Copy the folders to your /Documents folder. My structure is :
Prosim737
Prosim Audio
Prosim CDU
Prosim MCP
Prosim Capt Display
Prosim FO Display
Prosim Upper EICAS
Prosim Lower EICAS
The last four is ProsimDisplay which I just has copied and renamed
Start each ProsimDisplay.exe and place the instruments where you want. Next time it remembers where you placed it, can’t be more simple.


Configuration
ProSim have this part very easy for everybody. It’s very limited regarding programming and interfacing. Just use the interface to connect to switches - encoders etc.
Open ProSim server, and select configuration. Go to Switches and flip the switch you want to assign.


When you activate a switch you can see the number of this in the upper left corner. Press A for the corresponding switch in ProSim and it will assigned - can it be more simple !
I have chosen Opencockpits modules to control output and servos. These requires that SIOC from OC are installed and some configuration.
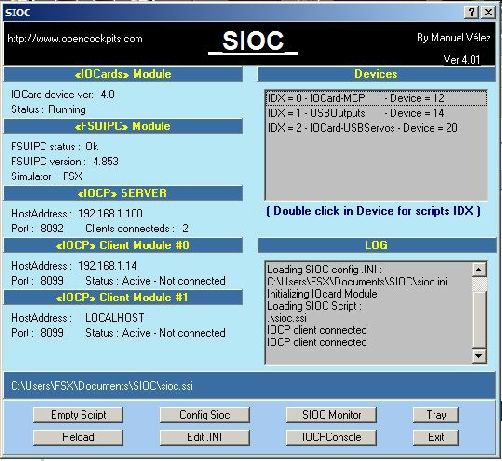
First install SIOC, eg. In \Documents. The SIOC.ini has to include those boards you are using. I’m using the MCP, USB Servo card and USB Output card. So these has to be in the ini-file, like this:
MASTER=0,5,1,12 // MCP has ID=12
MASTER=1,6,1,14 // Output has ID=14
USBServos=2,20
The should the SIOC interface look like this:

Now we have to tell ProSim which IP SIOC are using, mine are 192.168.1.14 port 8092.
Go to the Config tab in the ProSim server and enter this.

The tricky part comes to SIOC. All the outputs and servos has to be entered into the file SIOC reads.
If you are using the MCP from OC, then open the prosim_mcp.txt file in the ProSimMCP\Opencockpits folder.
To assign a output you need to add a line for each output.
Var 8000, Link IOCARD_OUT, Device 1, Output 53 // Anti skid INOP
Here I have assigned Var 8000 to Device 1 which are my Output card, and to Output 63. This will light up the Anti Skid INOP led.
Continue to add the rest of the outputs/leds like this. You can see my file here.
To use the Servo card, the output on this also have to be stated in this file.
Var 800, name servo_flaps, Link USB_SERVOS, Device 2, Output 1, PosL 180, PosC 511, PosR 1023
Var 801, name apu, Link USB_SERVOS, Device 2, Output 6, PosL 180, PosC 511, PosR 1023
Var 802, name duct, Link USB_SERVOS, Device 2, Output 5, PosL 180, PosC 511, PosR 1023
Var 803, name fueltemp, Link USB_SERVOS, Device 2, Output 2, PosL 180, PosC 511, PosR 1023
Above shows my four servos.
Save the file in the SIOC directory, and load it into SIOC.

When it comes to the servos the calibration is the most easy setup I have ever seen. Go to the Gauges tab, select the servo you want to assign, select IOCP enter the Var number and move the sliders so they match the needle on the gauge. This is great ;-)

ProSim only supports encoders which are connected to a Pokeys Card. Connect the encoder to the card use the software which comes with the card and configure each input / encoder.
Go to the encoder tab in ProSim, and configure each input to the according encoder.
